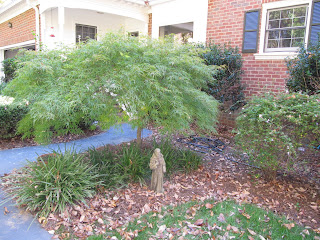
For my readers who are not gardeners, this post will probably be boring. But I have enough passionate gardeners in my family that I wanted to post about how I'm learning to prune.
We have a Japanese Maple, which needed serious pruning as it had overgrown our sidewalk. It was planted in a terrible spot, far too close to the house--and let me tell you how much bad planting choices (usually by developers) drive me nutty! I don't know why it is so hard to do the math that if a plant is going to grow, for example, to four feet in diameter, it should be planted two feet plus air space away from the house.
Anyway, since waiting the months required for the sap to stop running (a time when one shouldn't prune), Chris and I decided to try to learn how to prune properly in order to save more money on labor. This home came with landscaping that requires a lot of care month by month. I even created a garden binder that reminds me each month all the tasks needed for each plant in the yard. We studied some online videos about pruning Japanese maples, ordered a book, bought new tools, and asked questions of my aunt and dad, who are both extremely skilled gardeners.
 Before
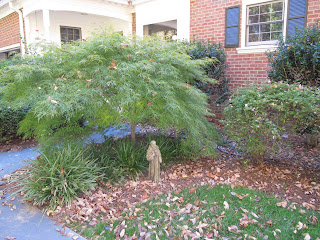
  After: We made the bold choice to limb up the tree and take it back to a tree shape instead of a shrub shape. The shrubs have been so overplanted around our house, the last thing we need is another giant shrub. We're hoping to transplant the two Camellias currently on the other side of the sidewalk. (Why, oh why, were Camellia sasanquas planted in spaces walled in at 3'x3' when the plants grow 6-10' tall and 5-7' wide? To keep the Camellias in the space, we have to cut them so small that they don't get a chance to flower!)
After: I knew that the first thing I was supposed to cut were the dead limbs. But when I began, I couldn't find any dead limbs. After I brought the diameter in and limbed up the tree, I was finally able to crawl underneath and stare upwards. I stared and stared and finally dead branches began jumping out at me all over the place! Dead, dead, dead! I'd cut all that I could see, pause, stare some more, and find more dead branches. I bet the tree is much happier now without carrying all that dead weight, restricting air flow and sunlight.

After

After: I was anxious about what to do with the top of the tree. I could see some "wild hairs" coming out of the top. They looked a little funny, but I thought that they were probably limbs growing into the weeping arches they will be in a year or two. I decided to pause, study the tree more, and ask people who know more than me to examine these photos.


Good start! You are doing it right:
ReplyDeletestudy the tree, after removing anything dead, then take a bit, keep studying from all directions. It doesn't have to be done all at once (and is better not: you can't replace something once it's gone).
I have a bonsai-in-training (seedling planted last year) in my upstairs bathroom window that is an amusement to play with (a pinch or 2 here & there), daily trickle to support moss covering (south window).
Wow! I know nothing of gardening, but you have such lovely landscaping around your home. What a beautiful after picture. And, I guess developers just don't know any better and they just plant. What a tragedy not to allow proper space for a plant to flourish.
ReplyDelete